Brake Pad Break-In Done Right: The Technician’s Complete Guide

You install new pads and rotors, torque everything to spec, pump the pedal, and hand the keys back. Customer drives off. Three days later, they’re on the phone complaining about vibration, noise, or a soft pedal.

You pull the car back in, and the rotors already have dark spots. The pads look uneven. And you’re eating labor on a comeback that shouldn’t exist.

Nine times out of ten, this is a break-in problem. The pads weren’t bedded correctly, and the friction surface never transferred properly to the rotor. It takes five minutes to do right. Skipping it creates hours of diagnostic work and wasted parts.

Why Break-In Matters (The Science in 60 Seconds)

Ceramic pads use adherent friction. During break-in, the pad deposits a thin, even layer of friction material onto the rotor surface. If that transfer film develops unevenly, you get hot spots, inconsistent friction, and pulsation.

Semi-metallic pads use abrasive friction. Break-in seats the pad surface against the rotor and establishes a consistent contact pattern.

In both cases, the break-in also burns off residual gases and volatile compounds from manufacturing. If those don’t burn off in a controlled way during bedding, they’ll cause green fade during normal driving.

The Standard Break-In Procedure

Step 1: Verify the installation. Pump the brake pedal several times to seat the pads. Confirm a firm pedal. Check for dragging or abnormal noise at very low speed.

Step 2: Perform 8 to 10 moderate stops. From approximately 35 mph, apply moderate brake pressure (about 60-70% of full force) to slow to about 10 mph. Do not come to a complete stop.

Step 3: Perform 2 to 3 slightly more aggressive stops. From approximately 45 mph, apply firmer pressure (about 80% of full force) to slow to about 15 mph. Avoid a complete stop.

Step 4: Cool down. Drive at moderate speed for 2 to 3 minutes without heavy braking.

Step 5: Avoid sitting on the brake. This is the part that matters most. After bedding stops, do not sit at a stoplight or parking spot with the brake pedal pressed. Hot pads clamped against a stationary rotor deposit a thick, uneven patch of friction material. That deposit creates a high spot you’ll feel as pulsation within the first week.

Adjustments by Pad Type

Ceramic Pads

The standard procedure above is designed primarily for ceramic formulations. Pay special attention to Step 5. For premium vehicle-specific pads like DFC 5000 Advanced, the transfer film develops more predictably because the friction compound is matched to the specific rotor.

Semi-Metallic Pads

Semi-metallic pads can handle slightly more aggressive break-in. Increase starting speed to 40 mph and apply slightly more pressure. For DFC Heavy Duty or DFC Ultimate Duty Performance pads, break-in is especially important because the first towing session shouldn’t be the uncontrolled break-in.

Performance Pads

DFC Active Performance pads are formulated for higher operating temperatures. From 50 to 60 mph, perform 8 to 10 progressively harder stops with 30 seconds between each. The final 2 to 3 stops should briefly activate ABS. Then do a 5-minute cool-down lap.

Police / Pursuit Pads

DFC Police pads are AMECA certified for pursuit-rated applications. Follow the performance procedure, then add 3 to 4 stops from 60 mph with firm braking.

The Post-Curing Advantage

Without post-curing: The first few hundred miles become the final curing stage. Inconsistent friction, more noise during break-in, and longer time before optimal performance.

With post-curing: Break-in is shorter and more predictable. The transfer film develops more evenly.

DFC post-cures 100% of its brake pads across every product line.

What Happens When Break-In Goes Wrong

Pad imprinting / material deposits. Dark spots on the rotor face from uneven pad material transfer. Causes pulsation that feels like a warped rotor. Usually from sitting on the brake with hot pads.

Glazing. The pad surface looks smooth and shiny with a blue or golden tint. The friction material was overheated without proper bedding. Light glazing can be scuffed with sandpaper and re-bedded. Heavy glazing means new pads.

Green fade. Brakes felt weak during the first few hard stops, then improved. Residual manufacturing gases pushing the pad away from the rotor. Post-cured pads virtually eliminate green fade.

Uneven wear patterns. Check that the caliper slides freely and hardware is correctly installed before blaming break-in.

The 60-Second Customer Explanation

“We’ve done the initial bedding on your new brakes, but they’ll continue to break in over the next hundred miles or so. During that time, avoid really hard braking if you can. And at red lights, try not to hold the brake pedal down hard. Light pedal pressure at stoplights is fine. The pads are still conditioning to the rotors.”

The Comeback Prevention Connection

Industry estimates suggest that improper pad bedding contributes to roughly 30% of brake-related warranty returns. Five minutes of bedding stops. Sixty seconds of customer education. Zero comebacks from break-in issues.

Find the right brake pads at dynamicfriction.com. Every DFC pad is 100% post-cured.

Break-in isn’t optional. It’s the final step of every quality brake installation.

Related: How to reduce brake job comebacks | Ceramic vs semi-metallic: a professional guide

The Warped Rotor Myth: What Actually Causes Brake Pulsation (And How to Fix It for Good)

Every technician has heard it. The customer walks in, grabs the counter, and says those two words: “warped rotors.”

And for decades, that’s exactly what the industry called it. Warped rotors. The diagnosis that explains the shudder in the steering wheel, the pulsing brake pedal, the vibration that gets worse the harder you stop. Simple enough, right?

Here’s the problem. Rotors don’t actually warp.

Not in any way that matches what most people mean when they say it. And if your shop keeps diagnosing brake pulsation as “warped rotors” without understanding what’s really going on underneath, you’re setting yourself up for comebacks, lost labor hours, and frustrated customers who keep coming back with the same complaint three months later.

Let’s talk about what’s really happening. Because once you understand it, you can fix it right the first time and stop chasing the same problem on every brake job.

Why Brake Rotors Can’t “Warp” Under Normal Driving

Cast iron brake rotors are manufactured at temperatures between 2,500 and 2,800 degrees Fahrenheit. That’s the temperature of molten iron being poured into a mold. To physically distort that casting after it’s cooled and machined, you’d need to hit it with similar heat.

Your customer’s Camry isn’t doing that. Not even close.

During normal driving, brake rotors operate between 200 and 400 degrees Fahrenheit. Hard braking on a steep mountain grade might push them to 600 or 700 degrees. Even a track day in a sports car rarely gets rotors above 900 degrees consistently.

To actually warp a cast iron rotor (meaning to permanently deform its shape through heat), you’d need to sustain temperatures above 1,000 to 1,200 degrees Fahrenheit across the rotor unevenly. That doesn’t happen in normal or even aggressive street driving.

So if the rotor isn’t warped, why does the brake pedal pulse?

The Real Culprit: Disc Thickness Variation

The answer is disc thickness variation, or DTV. This is the measurable difference in thickness between the thickest and thinnest points of the rotor as it rotates. When that variation gets large enough (usually more than 0.001 inches, depending on the application), the brake pad displacement changes as the rotor spins through the caliper. That fluctuation pushes and pulls the piston, which moves the brake fluid, which pulses the pedal.

That’s not warping. That’s uneven wear.

And here’s what matters to you as a tech or a shop owner: DTV is almost always caused by something that happened during the last brake job. Not by how the customer drives.

How Lateral Runout Creates DTV

The root cause of most disc thickness variation is lateral runout. That’s the side-to-side wobble of the rotor as it spins on the hub.

Picture it like this. If a rotor has even 0.002 inches of lateral runout, one spot on the rotor face is slightly closer to the brake pad than the rest. Every time the wheel rotates, that high spot makes contact with the pad. Over thousands of rotations, two things happen depending on your pad type:

With semi-metallic pads: The pad scrapes material off the rotor at the high spot. The rotor gets thinner in that area. Over time, you get a measurable thickness variation that causes pulsation.

With ceramic pads: The pad deposits friction material onto the rotor at the high spot. The rotor gets thicker in that area. Same result, different mechanism. Same pulsation.

Either way, you end up with a rotor that has uneven thickness. And either way, the customer comes back complaining about a vibration that wasn’t there when they picked up the car.

The Five Things That Actually Cause Brake Pulsation

If you want to eliminate brake pulsation complaints (and the comebacks that come with them), focus on these five causes. Every single one is preventable during a quality brake job.

1. Rust and Debris on the Hub Mounting Surface

This is the number one cause of lateral runout in the field. Period.

When a rotor sits on a hub that has corrosion buildup, rust scale, or road debris on the mounting face, the rotor can’t sit flat. Even a few thousandths of an inch of rust between the hub and rotor creates enough runout to eventually cause DTV.

The fix: Clean the hub face every single time you install a rotor. Wire brush it. Use a hub cleaning tool. Get the rust off. This takes 60 seconds and prevents 80% of pulsation comebacks.

2. Improper Lug Nut Torque

This one gets overlooked constantly, especially in busy shops where impact guns are doing the final tightening.

When lug nuts are torqued unevenly (which happens every time you rattle them down with an impact instead of using a torque wrench), the rotor mounting face gets pulled into a slight cone shape. That creates lateral runout from the start.

The fix: Hand-torque lug nuts in a star pattern to the manufacturer’s spec. Every time. No exceptions. Yes, it takes an extra minute. That minute saves you the 45 minutes of diagnosing a comeback.

3. Over-Tightening with Impact Guns

Related to the above, but worth calling out separately. Pneumatic impact guns can easily exceed the torque spec for wheel fasteners, which not only creates uneven clamping force but can also damage the threads and hub face over time.

The fix: Use the impact to snug the lug nuts, then finish with a calibrated torque wrench. Train every tech in the shop to do this consistently.

4. Pad Material Deposits (Pad Imprinting)

When new brake pads aren’t properly broken in, friction material can transfer unevenly onto the rotor surface. This creates high spots of deposited material that act just like thickness variation, producing a pulsation that the customer notices within the first few hundred miles.

This is especially common with ceramic formulations that rely on an adherent friction mechanism (transferring a thin, even layer of pad material onto the rotor face). If that initial transfer is uneven because the pads weren’t bedded properly, you get deposits instead of a uniform film.

The fix: Follow the pad manufacturer’s break-in procedure. For most applications, that means a series of moderate stops from 30-35 mph followed by a cool-down period. Don’t skip this step, and tell the customer not to sit on the brakes at a stoplight right after the install. That’s how you get pad imprinting.

One advantage of post-cured brake pads (like DFC’s entire lineup) is that the curing process stabilizes the friction material before it ever goes on the vehicle. That means more consistent pad transfer during break-in and a more uniform friction film on the rotor. It’s a small manufacturing detail that makes a real difference in the field.

5. Low-Quality Rotor Castings

Not all rotors are created equal. Cheap offshore castings can have inconsistencies in the iron metallurgy, uneven cooling during manufacturing, or poor machining tolerances. Those inconsistencies might not show up as lateral runout on a new rotor, but they accelerate the development of DTV once the rotor is in service.

The fix: Use rotors that are electronically inspected for runout, thickness variation, and dimensional accuracy before they ship. DFC runs every rotor through a 100% electronic inspection station that measures over 20 attributes to ensure OE-level specs. That kind of quality control eliminates the manufacturing variables that contribute to premature DTV.

How to Measure for DTV and Lateral Runout

If a customer comes in with a pulsation complaint, here’s the diagnostic process that actually identifies the root cause instead of just throwing parts at it.

Measuring Lateral Runout

  1. Mount a dial indicator on a fixed point (the caliper bracket or a magnetic base on the knuckle)
  2. Position the indicator tip against the rotor face, about 1 inch from the outer edge
  3. Rotate the rotor 360 degrees by hand
  4. Record the total indicator reading (TIR). Most manufacturers spec lateral runout at 0.002 inches or less

If runout exceeds spec, the rotor needs to come off. Clean the hub face, reinstall, and re-measure. If runout is still out of spec with a clean hub, the rotor itself may need to be replaced, or the hub assembly may have bearing wear contributing to the wobble.

Measuring Disc Thickness Variation

  1. Use an outside micrometer (not a caliper, you need the precision)
  2. Take thickness measurements at 8 to 12 equally spaced points around the rotor
  3. Record the difference between the thickest and thinnest readings
  4. Most manufacturers spec DTV at 0.001 inches or less

If DTV exceeds spec, the rotor needs to be replaced. Resurfacing can temporarily correct thickness variation, but if the underlying runout issue isn’t addressed, the DTV will come right back.

The Corrosion Factor: Why This Problem Is Getting Worse

There’s a reason brake pulsation complaints have increased over the past decade, and it’s not because rotors are getting worse. It’s because vehicles sit more.

Remote work, hybrid schedules, multicar households, and the rise of EVs with regenerative braking all mean that brake rotors spend more time sitting still, collecting moisture, and building up surface rust. That corrosion creates uneven surfaces that accelerate DTV development, especially on vehicles that sit for days between drives.

This is one reason coated rotors have gone from a “nice to have” to a “need to have” for shops that want to reduce pulsation comebacks. A quality corrosion-resistant coating (like DFC’s GeoSpec finish) protects the non-friction surfaces and the edges of the rotor from the rust buildup that contributes to runout over time. It also keeps rotors looking clean on the shelf, which matters if you’re a distributor managing inventory.

The Comeback Prevention Checklist

Print this out. Tape it to the wall in every bay. Follow it on every brake job and your pulsation comeback rate will drop to nearly zero.

  • Clean the hub mounting face (wire brush or hub cleaning tool)
  • Inspect the hub face for deep pitting or damage
  • Install rotor and check lateral runout with a dial indicator before installing pads
  • If runout exceeds 0.002″, reposition the rotor on the hub or address the hub surface
  • Install pads and hardware per manufacturer instructions
  • Torque lug nuts in a star pattern to manufacturer spec with a calibrated torque wrench
  • Perform proper pad break-in procedure (series of moderate stops, allow cool-down)
  • Advise customer: avoid heavy braking for the first 100 miles, don’t sit on the brake at stoplights during the break-in period

Stop Saying “Warped Rotors”

Language matters. When we tell customers their rotors are warped, we’re setting an expectation that rotors just do that on their own and there’s nothing anyone can do about it. That leads to repeated rotor replacements that don’t fix the actual problem, which means the customer keeps coming back with the same complaint and eventually loses trust in your shop.

When you explain that the pulsation is caused by thickness variation from a contaminated hub surface or improper torque, you’re telling the customer something different: this is preventable. We know how to fix it correctly. And when we do, it stays fixed.

That’s the difference between a shop that churns through brake jobs and a shop that builds a reputation for doing it right.

Choosing the Right Rotor to Minimize DTV

Not every rotor gives you the same starting point. Here’s what to look for when selecting rotors that resist DTV development:

Consistent metallurgy. Premium iron castings (G3000/G11H18 spec) with controlled carbon content provide more uniform wear characteristics than budget castings with inconsistent alloy composition.

Tight manufacturing tolerances. Rotors that are electronically inspected for runout and parallelism out of the box give you a better starting point. If the rotor has 0.001″ of runout before it ever goes on the vehicle, you’re already halfway to the DTV threshold.

Corrosion protection. Coated rotors reduce the surface rust that contributes to uneven pad contact and accelerated thickness variation. This matters more now than ever, with vehicles sitting longer between drives.

DFC’s rotor lineup is built with all three of these factors in mind. Every rotor passes a 100% electronic inspection measuring over 20 attributes. The Carbon Alloy line uses enhanced iron formulations for better wear characteristics. And the GeoSpec Coated line adds a patented corrosion-resistant finish that outperforms conventional zinc and paint coatings in salt spray testing.

Find DFC rotors for your application at dynamicfriction.com.

The “warped rotor” myth has been around for decades, but the science is clear: brake pulsation is caused by disc thickness variation and lateral runout, not by heat warping. Proper installation technique, quality components, and attention to the hub mounting surface are what separate a brake job that lasts from one that comes back in 90 days.

How to Reduce Noise and Vibration in Brake Installations with DFC Shims

DFC Blog

Achieve a Quieter, Smoother Ride with Premium Brake Shims

Brake noise and vibration can be frustrating for drivers and a challenge for mechanics. Whether it’s an annoying squeal, a grinding noise, or a pulsating pedal, these issues often stem from poor damping and vibration control. One of the most effective ways to reduce brake noise and vibration is by using high-quality shims—like DFC Premium Rubber-Steel-Rubber (RSR) Shims—designed to improve braking performance, enhance comfort, and extend the life of your braking system.

In this guide, we’ll explore how brake noise occurs, why shims are essential, and how DFC brake shims can help you achieve a smoother, quieter brake installation.


Why Do Brakes Make Noise?

Brake noise is typically caused by vibration and resonance between the brake pads, rotors, and calipers. Some of the most common causes include:

  • Improper brake pad fitment – Pads that don’t sit flush against the caliper can create movement and noise.
  • Worn or damaged brake components – Old rotors, uneven pad wear, and lack of lubrication can lead to squealing and grinding.
  • Inadequate damping materials – Poor-quality or missing shims can increase vibrations.
  • Environmental factors – Dust, moisture, and extreme temperatures can affect brake performance.

While proper installation and high-quality brake pads are crucial, brake shims play a vital role in noise reduction by absorbing vibrations and preventing metal-to-metal contact.


The Role of Brake Shims in Noise and Vibration Control

Brake shims act as a buffer between the brake pad and caliper, helping to reduce vibrations and noise. High-quality shims absorb energy and dampen sound waves that would otherwise create unwanted brake noise.

DFC Premium Rubber-Steel-Rubber (RSR) Shims are specifically engineered to:

Reduce Noise & Vibration – Multi-layered construction absorbs sound and minimizes movement.
Improve Brake Performance – Maintains consistent contact between the pad and rotor for smooth braking.
Enhance Durability – Designed to withstand extreme temperatures and prolonged use.
Optimize Comfort – Delivers a quieter, smoother ride for drivers.


How DFC Brake Shims Provide Superior Noise Reduction

Not all brake shims are created equal. DFC’s Premium RSR Shims stand out due to their advanced three-layer construction, which ensures optimal vibration damping and noise suppression.

1. Rubber-Steel-Rubber (RSR) Construction

DFC shims are designed with a rubber-steel-rubber structure, providing superior damping properties. The rubber layers absorb vibrations, while the steel core maintains structural integrity, ensuring long-lasting performance.

2. OEM Fit & Functionality

DFC shims are precision-engineered to match or exceed OEM standards, ensuring a perfect fit and seamless installation. This guarantees consistent performance across a wide range of vehicle applications.

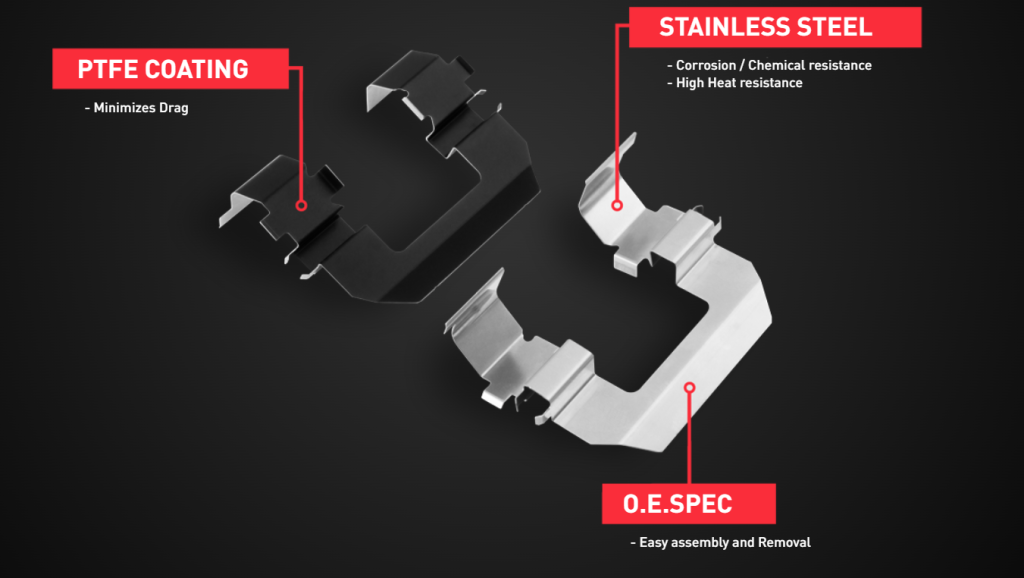
3. Thermal & Corrosion Resistance

Brake components experience extreme temperatures, moisture, and debris. DFC shims are thermally resistant to withstand high heat levels and corrosion-resistant for extended durability.

4. Improved NVH (Noise, Vibration, and Harshness) Characteristics

By minimizing unwanted brake vibrations and harmonics, DFC brake shims significantly enhance NVH performance, resulting in a quieter, more comfortable driving experience.


Best Practices for Installing Brake Shims

To maximize the benefits of DFC shims and ensure a noise-free brake installation, follow these expert tips:

Clean the Caliper Bracket & Hardware – Remove old brake debris and rust before installing new shims.
Apply Lubrication Sparingly – Use high-quality brake lubricant on contact points but avoid over-application.
Ensure Proper Pad Alignment – Make sure brake pads are seated correctly against the shims and caliper.
Check for Worn or Warped Rotors – If the rotors are uneven or excessively worn, replace them for optimal braking.
Use High-Quality Brake Pads – Pairing DFC shims with DFC brake pads ensures the best noise and vibration control.


Upgrade Your Braking System with DFC Shims Today

If you’re experiencing brake noise and vibration, upgrading to DFC Premium Rubber-Steel-Rubber Shims is a simple yet effective solution. Their advanced three-layer design, OEM precision fit, and superior noise-damping properties make them an essential upgrade for any brake installation.

For a quieter, smoother, and more reliable braking experience, choose DFC brake shims—the industry leader in brake noise reduction technology.